Builder(建造者模式)
对一个复杂对象的构建与它的表示分离,使得同样的构建过程可以创建不同的表示
其实建造者模式在项目中进场能够看到,比如在Android中我们使用AlertDialog的时候
1
2
3
4
5
6
7
8
9
AlertDialog.Builder builder = new AlertDialog.Builder(context) .setIcon(R.mipmap.ic_launcher) .setTitle("This is title" ) .setMessage("This is Message" ) .setPositiveButton("ok" , null ) .create(); builder.show();
类似的还有很多的库都使用了这种建造者模式,可以见的学习这种模式的必要性了
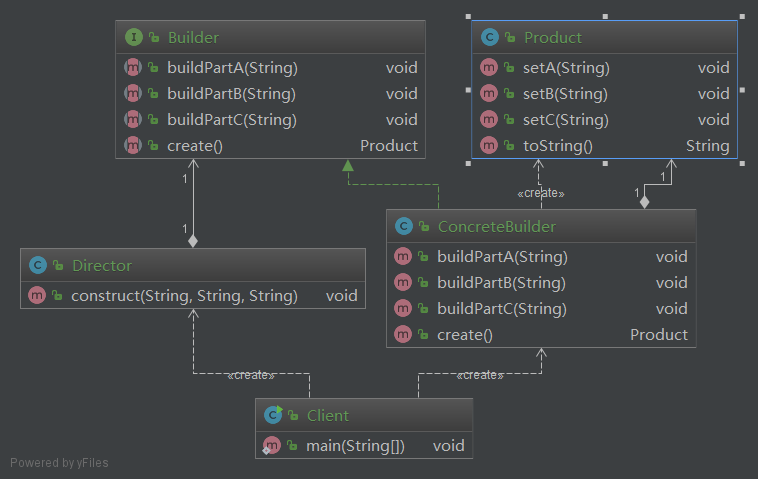
Builder(建造者模式)的UML类图
其中:
Builder类 : 是抽象类,用来规范子类的组建
Concrete Builder类 : 是Builder的具体实现类
Director类 : 用于将产品同一组装
Product类 : 要生产的产品
Client类 : 客户端
下面来看一下例子,如何实现一个简单的建造这模式
建造者模式的简单实现 以构建一辆车为例,一辆车大体上是有车牌,颜色,车的标牌等构成
首先创建构建着接口
1
2
3
4
5
6
7
8
9
10
11
12
13
14
public interface Builder void buildColor (String color) void buildLicensePlate (String licensePlate) void buildBrand (String brand) Car build () ; }
然后创建汽车产品类
1
2
3
4
5
6
7
8
9
10
11
12
13
14
15
16
17
18
19
20
21
22
23
24
25
26
27
public class Car private String color; private String licensePlate; private String brand; public void setColor (String color) this .color = color; } public void setLicensePlate (String licensePlate) this .licensePlate = licensePlate; } public void setBrand (String brand) this .brand = brand; } @Override public String toString () return "Car{" + "color='" + color + '\'' + ", licensePlate='" + licensePlate + '\'' + ", brand='" + brand + '\'' + '}' ; } }
然后创建汽车构建实现类
1
2
3
4
5
6
7
8
9
10
11
12
13
14
15
16
17
18
19
20
21
22
23
24
25
26
27
28
29
public class CarBuilder implements Builder Car car; public CarBuilder () this .car = new Car(); } @Override public void buildColor (String color) car.setColor(color); } @Override public void buildLicensePlate (String licensePlate) car.setLicensePlate(licensePlate); } @Override public void buildBrand (String brand) car.setBrand(brand); } @Override public Car build () return car; } }
最后创建产品组装类
1
2
3
4
5
6
7
8
9
10
11
12
13
14
public class Director Builder builder; public Director (Builder builder) this .builder = builder; } public void construct (String color, String licensePlate, String brand) builder.buildColor(color); builder.buildLicensePlate(licensePlate); builder.buildBrand(brand); } }
一个简单的Builder构建者就完成了,我们来测试一下
1
2
3
4
Builder builder = new CarBuilder(); Director director =new Director(builder); director.construct("red" , "A88888" , "Ferrari" ); System.out.println(builder.build().toString());
输出结果
1 Car{color='red', licensePlate='A88888', brand='Ferrari'}
一俩车牌号为A88888的红色法拉利就做完了!
但是为什么不是链式调用呢?
如果需要链式调用的话就需要对代码做一下修改
比如这里要创建一辆Ferrari
我们先创建一个Ferrari类,并且创建一个Builder内部类
具体代码如下:
1
2
3
4
5
6
7
8
9
10
11
12
13
14
15
16
17
18
19
20
21
22
23
24
25
26
27
28
29
30
31
32
33
34
35
36
37
38
39
40
41
42
43
44
45
46
47
48
49
50
51
52
53
54
55
56
57
58
public class Ferrari private String color; private String licensePlate; private String brand; public void setColor (String color) this .color = color; } public void setLicensePlate (String licensePlate) this .licensePlate = licensePlate; } public void setBrand (String brand) this .brand = brand; } public static class Builder Ferrari ferrari; public Builder () ferrari = new Ferrari(); } public Builder setColor (String color) ferrari.setColor(color); return this ; } public Builder setLicensePlate (String licensePlate) ferrari.setLicensePlate(licensePlate); return this ; } public Builder setBrand (String brand) ferrari.setBrand(brand); return this ; } public Ferrari build () return ferrari; } } @Override public String toString () return "Car{" + "color='" + color + '\'' + ", licensePlate='" + licensePlate + '\'' + ", brand='" + brand + '\'' + '}' ; } }
测试一下
1 2 3 4 5 6 7 Ferrari ferrari = new Ferrari.Builder() .setBrand("Ferrari" ) .setColor("Red" ) .setLicensePlate("B88888" ) .build(); System.out.println(ferrari.toString());
输出结果
1 Car{color='Red', licensePlate='B88888', brand='Ferrari'}
其实,关于链式调用还有另一种写法,
这里创建一个Audi类,同样为其创建Builder内部类
1
2
3
4
5
6
7
8
9
10
11
12
13
14
15
16
17
18
19
20
21
22
23
24
25
26
27
28
29
30
31
32
33
34
35
36
37
38
39
40
41
42
43
44
45
46
47
public class Audi private String color; private String licensePlate; private String brand; public static class Builder private String color; private String licensePlate; private String brand; public Builder setColor (String color) this .color = color; return this ; } public Builder setLicensePlate (String licensePlate) this .licensePlate = licensePlate; return this ; } public Builder setBrand (String brand) this .brand = brand; return this ; } public Audi build () return new Audi(this ); } } private Audi (Builder builder) color = builder.color; licensePlate = builder.licensePlate; brand = builder.brand; } @Override public String toString () return "Car{" + "color='" + color + '\'' + ", licensePlate='" + licensePlate + '\'' + ", brand='" + brand + '\'' + '}' ; } }
在这里没有在Builder内部调用外部的setter方法,而是直接在内部类中初始化数据,然后在build之后再传递给私有构造函数,但是这里要注意,因为已经显示的写了一个构造函数,那么系统就不会为我们创建无参的共有构造函数,但是好处就是强制使用了构建者模式构建实例对象
同时,这种写法也是在《Effective Java》 中提倡的写法
使用方法跟之前的一样,输出结果也没有什么区别,读者可以自行尝试
具体使用哪一种写法,视实际情况而定
总结 关于构建者模式:
优点 具有良好的封装性,容易扩展缺点 会产生多余的Builder对象,消耗内存
源码地址
更多内容