Decorator(装饰)
装饰模式 ( Decorator Pattern ),或者说叫包装模式 ( Wrapper Pattern ),作为结构型模式,其主要功能通俗的说就是在原有对象的基础上添加新的东西
装饰模式在平常生活中也是很常见的,这里就以蛋糕店做蛋糕为例吧
当我们经过一系列手工操作制作出一个基本的蛋糕胚时,蛋糕店想要将这个蛋糕卖出去,那么就需要在这个蛋糕胚上做一些装饰,比如涂上一层奶油,加一些巧克力或者水果之类的。
这样想来装饰模式也是很好理解的。当我们需要透明且动态地扩展类的功能时,我们就可以使用装饰模式
Decorator(装饰)模式的 UML 类图
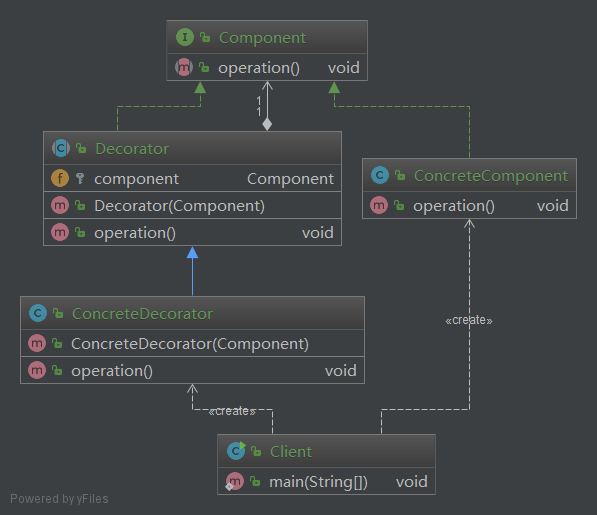
- Component : 组件接口,被装饰的原始对象
- ConcreteComponent : 具体组件,组件接口的实现类,被装饰的具体对象
- Decorator : 抽象装饰器,内部持有组件对象的一个实例
- ConcreteDecorator : 具体装饰器
- Client : 客户类
下面看一下装饰器模式的简单实现
首先就是 Component 组件接口
public interface Component {

    void operation();

}
然后就是具体的组件,需要被装饰的对象 ConcreteComponent
public class ConcreteComponent implements Component {
    @Override
    public void operation() {
        System.out.println("This is Concrete Component");
    }
}
简单起见,这里的操作只是输出一条语句
接着就是实现装饰器 Decorator
public abstract class Decorator implements Component{

    protected Component component;

    public Decorator(Component component) {
        this.component = component;
    }

    @Override
    public void operation() {
        component.operation();
    }
}
这里将装饰器设置为抽象类,并且在类的内部持有一个组件对象的一个引用
最后就是具体的装饰器
public class ConcreteDecorator extends Decorator {

    public ConcreteDecorator(Component component) {
        super(component);
    }

    @Override
    public void operation() {
        System.out.println("Add decorator operation 1");
        super.operation();
        System.out.println("Add decorator operation 1");
    }
}
在实现的 operation() 方法中,简单起见,还是输出几条语句来达到一种在原有的功能上添加了新功能的目的,具体操作应该视具体情况而定
下面来看一下测试
Component component = new ConcreteComponent();
component.operation();

System.out.println("\n+--- After add decorator ---+\n");

Decorator decorator = new ConcreteDecorator(component);
decorator.operation();
分别执行了被修饰前和被修饰后的操作
装饰器模式的简单实现
介绍了装饰模式的 UML 类图结构,下面就可以结合简单的具体例子,来实现一个功能了
那么这里将以制作蛋糕为例,被装饰者将是一个蛋糕,而要实现的装饰操作就是,在原有的蛋糕基础上,添加新的东西以达到装饰成新蛋糕的目的
首先就是蛋糕类接口 Cake
public interface Cake {
    void make();
}
具体的蛋糕,或者说是蛋糕胚 CakeEmbryo
public class CakeEmbryo implements Cake {

    @Override
    public void make() {
        System.out.println("Baking Cakes");
    }
}
抽象装饰器 DecorateCake
public abstract class DecorateCake implements Cake {

    Cake cake;

    public DecorateCake(Cake cake) {
        this.cake = cake;
    }

    @Override
    public void make() {
        cake.make();
    }
}
接下来就可以更具具体情况来对原有的东西进行装饰(添加新的东西)
装饰成巧克力蛋糕 ChocolateCake
public class ChocolateCake extends DecorateCake {

    public ChocolateCake(Cake cake) {
        super(cake);
    }

    @Override
    public void make() {
        addChocolate();
        super.make();

    }

    private void addChocolate() {
        System.out.println("Add Chocolate");
    }
}
装饰成水果蛋糕
public class FruitCake extends DecorateCake {

    public FruitCake(Cake cake) {
        super(cake);
    }

    @Override
    public void make() {
        addSomeFruit();
        super.make();
    }

    private void addSomeFruit() {
        System.out.println("Add some fruit");
    }
}
最后就可以进行测试了
Cake cake = new CakeEmbryo();
cake.make();

System.out.println("\n+--- Decorate Chocolate Cake ---+");
DecorateCake chocolateCake = new ChocolateCake(cake);
chocolateCake.make();

System.out.println("\n+--- Decorate Fruit Cake ---+");
DecorateCake fruitCake = new FruitCake(cake);
fruitCake.make();
测试输出
Baking Cakes

+--- Decorate Chocolate Cake ---+
Add Chocolate
Baking Cakes

+--- Decorate Fruit Cake ---+
Add some fruit
Baking Cakes
可以看到,经过使用装饰器模式,每一个被装饰过后的类的操作就具有了新的功能
总结
如果了解过 代理模式 的话,会发现装饰模式与代理模式是十分相似的,但是本质是有区别的
- 装饰模式 : 是以对客户端透明的方式扩展对象的功能,是继承方式的一种替代方案。装饰模式应该为所装饰的对象的增强功能
- 代理模式 : 给一个对象提供一个代理对象,并由代理对象来控制对原有对象的引用。代理模式对代理的对象施加控制,但不对对象本身的功能进行增强